Showing posts with label guest room. Show all posts

Monday, September 23, 2013

Guest Room: Part 4, Now Mia's Big Girl Room

We moved Mia into the guest room almost 2 months ago. We're keeping the nursery essentially the same (with the addition of a new rug), and I went a little wild decorating Mia's Big Girl Room (which is how she still refers to it, herself).

Her favorite color is purple, but finding a purple paint that doesn't look either too bright and crazy or too gray and mature was a battle I didn't have the energy for. Plus, who knows how long she'll love purple for. So I was inspired by this room I saw on Pinterest. I fell in love with the Pottery Barn Brooklyn quilt. It's girly, but not immature, and I loved the aqua and purple combination.

The funny thing was, when I went to pick a paint color, I ended up picking almost the same color that was already on the walls, so Jeff only had to paint over the stripes (Sherwin Williams Gray Screen, 2 coats of paint and primer in one).


I knew I wanted a white daybed with a trundle. Since we no longer have a guest room I wanted a place for guests if we absolutely needed one. And I wanted a daybed because the bed can't be pushed into the corner due to the placement of the heating vent. We found this bed at a local kid's furniture store, and instead of a daybed we ordered a regular bed with two footboards so that the ends are equal heights.


I found a dresser on Craigslist that I painted (Sherwin Williams Jet Stream) and added acrylic knobs to (the knobs cost more than the dresser!). I found a mirror at Home Goods that I painted (Behr Purple Mauve) and hung with a million of those command velcro strips. My mother made curtains from a Waverly damask/ikat print fabric.


All it really needs is something hanging over the dresser, but other than that I absolutely love this room. It is soft and pretty, and Mia loves it too.

Tuesday, January 11, 2011

The Guest Room: Part 3 (The Ugly Truth)

I am ashamed. Ashamed that our guest room/office currently looks like this:

While the nursery is coming along nicely, this room is the bane of my existence.


We sold our desk on craigslist right before Christmas. We found a smaller desk through Target that cost the exact amount we sold our other desk for. But Target keeps emailing me that there has been a delay in the order with no further information about when we might get it. Will we have it in time for the baby shower my mother is hosting for me at my house? Will we have it before the baby comes? Will we have it before she goes to college? Will we live in limbo for eternity? I am waiting to do any further organizing in this room until we get it, and it's driving me batty.


I am not good with mess and chaos, but for now this room has become a dumping grounds.

There, I have advertised my shame to the universe. May God and Target repay me with my new desk!

Thursday, October 28, 2010

Guest Room: Part 2

The big news around here is that today we found out we are having a girl! We are very excited.

But on back to the guest room. Last time I discussed the stripes on the wall. This time it's all about the furniture. Mainly the free furniture that got refinished for this room.

When Jeff and I lived in an apartment we found a chair out by the dumpster. I thought "I could refinish that chair. It's a perfectly good chair." But it sat in our apartment for 2 years and never got refinished or sat on because it had nails sticking out of the seat.


Last summer I finally refinished it. I sanded it down and painted most of it black, save for the detail on the back which got painted with the same green used as a stripe on the walls. I then used a high-gloss polyurethane coat to protect it.

The chair pad got trashed, but I saved the wooden seat. I bought a new pad at JoAnn's, cut it to size and stapled some quilting fabric (also from JoAnn's) to the seat. And voila.


Then one day shortly after we moved to our house we were driving through an adjacent rich neighborhood and I saw this nightstand on the side of the road. It was just my style. We are now officially the type of people who dumpster dive and pick through people's trash on the side of the road.


I used the same technique as the chair; sanded, painted, polyurethaned. The wood probably could have been refinished to look really pretty, but I wanted it to match the chair and I wanted a kind of high-gloss mod look.


(Note: I framed a little extra piece of fabric from the chair to hang on the wall to tie it all together)

I love the custom and consistent look of the furniture in this room. The styles are different, but I love that slightly eclectic look.

Thursday, October 21, 2010

Guest Room: Part 1

Eventually our third bedroom/office will become the nursery, so our computer and desk will have to move into the current guest bedroom.

Parts 1 and 2 will show where the guest room currently is, and Part 3 will be where it ends up once it's a guest room and an office.

When we moved in the guest room looked like this:


The first things we did were to paint over the peachy/peptobismal color with a light grayish blue. Then I primed and painted the closet doors as they are the first thing you see when you enter the room.

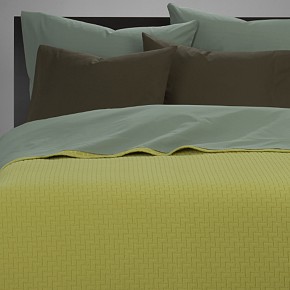
The inspiration for the colors of the guest room came from this bedding from CB2 (which I don't think is available any more).

After painting the room blue, I had a mishap while patching some holes in the wall. I accidentally painted over the spackle with semi-gloss paint while the base coat had been matte. Suddenly I had these shiny spots all over the walls. I considered buying more matte paint and repainting, until I realized that was just an obvious way of fixing my problem. What if, every where there is a shiny spot, I painted a stripe in a bold color? Yeah, maybe not the easiest approach, but it sounded way more fun than the alternative.

So I set out to paint stripes as a headboard for the guest bed to coordinate with the bedding. I considered doing it only in one area directly behind the bed, but I knew that we might want to shift the bed along the wall one day and not be married to that one particular location. So I committed to striping the whole wall.

I drew level vertical lines on the wall and then taped them off. I know people swear by frog tape to assure there is no bleeding, but this method worked for me: I used standard blue painter's tape, then I scraped over the tape with a spatula to ensure it was really on there. I had no problem with bleeding.

Once the tape was up, I took the paint chips of my colors and cut them into small strips. I used the strips to mark which stripes would be which color to make sure it looked random enough. When I was satisfied I started painting.

This is the point at which Jeff came home from work and was a little surprised to see what I had been up to all day.

I love how it turned out. It's unique and playful and catches visitor's eyes.