Tuesday, January 11, 2011

The Guest Room: Part 3 (The Ugly Truth)

I am ashamed. Ashamed that our guest room/office currently looks like this:

While the nursery is coming along nicely, this room is the bane of my existence.


We sold our desk on craigslist right before Christmas. We found a smaller desk through Target that cost the exact amount we sold our other desk for. But Target keeps emailing me that there has been a delay in the order with no further information about when we might get it. Will we have it in time for the baby shower my mother is hosting for me at my house? Will we have it before the baby comes? Will we have it before she goes to college? Will we live in limbo for eternity? I am waiting to do any further organizing in this room until we get it, and it's driving me batty.


I am not good with mess and chaos, but for now this room has become a dumping grounds.

There, I have advertised my shame to the universe. May God and Target repay me with my new desk!

Friday, December 31, 2010

The Bathroom Re-Do

We are working on the nursery over here, but for now it's just furniture in an otherwise empty room. Meanwhile our guest room is a disaster area as we sold our computer desk and I'm writing this from a folding table formerly from our laundry room.

I'll take this time to document the bathroom remodel we embarked on in May.

When we first moved into this house I didn't think the bathroom was too bad. I removed the wall paper and thought a fresh coat of paint would be enough for a while. But the more I lived with it, the more I came to abhor it. I hated cleaning it because it never looked clean. I hated the mauve tub and the soft spot in the wall under the shower head which I was sure meant the studs behind the wall were rotted (spoiler: they weren't, thank goodness). I hated that stepping on the tile floor with wet feet meant loose tiles would stick to said feet. I hated that someone had replaced tiles on the shower walls unevenly and that perhaps that same someone had caulked around the tub while under the influence. I hated the vinyl wall covering that had been applied to the ceiling and grew mildew like a champ.

But enough with the complaints, here are the befores:


Jeff's brother (a contractor) came and stayed at our house for about 5 days to help us (or more accurately, Jeff) with the work. I am so grateful to him and his expertise. He worked his ass off for us.

The demolition took only a few hours. The putting back together took 4 and a half days. Luckily we have another bathroom in the basement (one that I will likely never post photos of because it ain't pretty and as much as I'd like to make it over I fear it would still be like putting lipstick on a pig). Albeit has a frightening metal shower that kind of made me gag every time I stepped foot in it, but at least we didn't have to beg the neighbors for baths!


At the time we did the remodel I was working in a kitchen and bath showroom so I was able to get a lot of the big expenses at a deep discount; the vanity, the tile and the countertop mainly.


I painted. That was my main physical contribution.

And now the afters:

I wanted most of the permanent fixtures to be pretty neutral so that the paint color and accessories could be changed out with future owners.

I had considered doing some sort of glass accent tile in the shower, but my cheapness won out. I also have more of a modern aesthetic and was afraid that might alienate future buyers or that I might end up not liking it some day, so I went ultra-neutral with white subway tile, but I decided to stack it instead of stagger it for a bit more modernity.


Source List:
The vanity is Kraftmaid Grandview Cherry in Peppercorn

The countertop is Corian Whisper

The faucet is Vigo from Overstock.com

The floor tile has been discontinued

The wall tile, toilet (American Standard), and tub (Kohler) are all from Home Depot, I believe.

The shower controls are Kohler Corlais from Lowes.

The light fixture is from Bellacor.com

The window shade is a cordless cellular from JC Penney.

The shower curtain is Nautica from Bed, Bath & Beyond.

Happy New Year!

Thursday, December 23, 2010

DIY Nursery Art

... or How to Forge Some Artwork You Like But Are Too Cheap to Actually Buy

In my last nursery post I linked to some artwork I liked. I contemplated buying it, then considered the fact that it didn't look all that difficult to reproduce (because as stated above, am cheap). Especially since I had all of the supplies on hand to do so.

I copied the image I like, pasted it into word and stretched it to the size I wanted. I printed it out on the lowest quality.

Then I turned the page over and traced over the image with a pencil.

Then turned the page back over and centered it on top of some card stock which will be my final canvas. I made sure you hold the top page still, but it could be taped down if necessary. Then I scribbled over the image to transfer the pencil from the other side to the card stock.

I tried to take a picture of the pencil on card stock, but it was so light it did not photograph well. Then I used some acrylic paint from Michael's to fill in my tracing. I could have probably also used some high quality markers, but I like to get my paint brushes out every once in a while.

And voila:

Then I decided I really wanted an elephant too, so I made the giraffe a friend:

Both took less than a few hours, were totally free to me and customizable in terms of size and color, and I'm excited to see them in place.

Merry Christmas to me!

Monday, November 29, 2010

It's Beginning to Look a lot Like Christmas


I just love Christmas-time. I believe the Christmas season starts at Thanksgiving, and by Black Friday I am itching to get out my Christmas decorations.

For now we just do a little fake tree. I grew up with real trees, Jeff with fakes. I think someday I will gun for the real thing again, but not before I get a better vacuum cleaner! Jeff is decidedly opposed, but he's not the one who cleans anyway, and I think it's a nice tradition to go pick out a tree every year, and you can't beat the smell.

The fireplace. That metal reindeer I got the day after Christmas from Pier 1 is probably one of my favorite Christmas decorations.

The top of a bookshelf.

The shelves between the kitchen and dining room

The top of the buffet in the dining room. These houses were my grandfather's. He was very into model trains, and since he passed away several years ago my grandmother has been sending the grandchildren houses every Christmas. My grandpa loved Christmas so much, I just love having this little piece of him on display.

Sunday, November 28, 2010

Nursery Mood Board

5 months pregnant as of a few days ago, and I've finally pieced together my nursery mood board and started to purchase things for the nursery. Right now the office is looking half work space, half baby's room. I'm excited about what I came up with because I knew I didn't want to repaint, and I wanted something bright and not super girly.
The wall color is Sherwin Williams Clary Sage.

The crib is from Babies R Us.

The crib sheet is from Land of Nod, and I also want to get the matching changing pad cover for a changing pad on top of the dresser. I'm foregoing a bedding set because I find most of them to be too cutesy.

The chair is one we already have in the office (I no longer see it on the website) from Bassett.

The dresser has already been purchased & painted from local store that sells unfinished wood furniture, but is similar to the Hemnes dresser from Ikea.

The side table is also something we already own from Target. Ours is black and currently residing in the guest room that I'll be painting white.

The bookcase pictured is by KidKraft, but I purchased a similar one from the Christmas Tree Shops (possibly my favorite bargain store) for $30!

Pillows are from Target.

The artwork is from 2 Etsy sellers and Art.com.

The paper lanterns - in lieu of a mobile - are from Luna Bazaar.

I can't wait to really start pulling this all together!

Thursday, October 28, 2010

Guest Room: Part 2

The big news around here is that today we found out we are having a girl! We are very excited.

But on back to the guest room. Last time I discussed the stripes on the wall. This time it's all about the furniture. Mainly the free furniture that got refinished for this room.

When Jeff and I lived in an apartment we found a chair out by the dumpster. I thought "I could refinish that chair. It's a perfectly good chair." But it sat in our apartment for 2 years and never got refinished or sat on because it had nails sticking out of the seat.


Last summer I finally refinished it. I sanded it down and painted most of it black, save for the detail on the back which got painted with the same green used as a stripe on the walls. I then used a high-gloss polyurethane coat to protect it.

The chair pad got trashed, but I saved the wooden seat. I bought a new pad at JoAnn's, cut it to size and stapled some quilting fabric (also from JoAnn's) to the seat. And voila.


Then one day shortly after we moved to our house we were driving through an adjacent rich neighborhood and I saw this nightstand on the side of the road. It was just my style. We are now officially the type of people who dumpster dive and pick through people's trash on the side of the road.


I used the same technique as the chair; sanded, painted, polyurethaned. The wood probably could have been refinished to look really pretty, but I wanted it to match the chair and I wanted a kind of high-gloss mod look.


(Note: I framed a little extra piece of fabric from the chair to hang on the wall to tie it all together)

I love the custom and consistent look of the furniture in this room. The styles are different, but I love that slightly eclectic look.

Thursday, October 21, 2010

Guest Room: Part 1

Eventually our third bedroom/office will become the nursery, so our computer and desk will have to move into the current guest bedroom.

Parts 1 and 2 will show where the guest room currently is, and Part 3 will be where it ends up once it's a guest room and an office.

When we moved in the guest room looked like this:


The first things we did were to paint over the peachy/peptobismal color with a light grayish blue. Then I primed and painted the closet doors as they are the first thing you see when you enter the room.

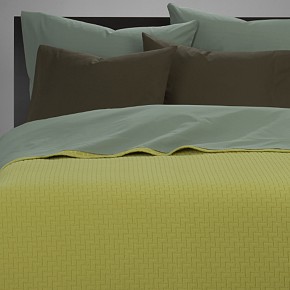
The inspiration for the colors of the guest room came from this bedding from CB2 (which I don't think is available any more).

After painting the room blue, I had a mishap while patching some holes in the wall. I accidentally painted over the spackle with semi-gloss paint while the base coat had been matte. Suddenly I had these shiny spots all over the walls. I considered buying more matte paint and repainting, until I realized that was just an obvious way of fixing my problem. What if, every where there is a shiny spot, I painted a stripe in a bold color? Yeah, maybe not the easiest approach, but it sounded way more fun than the alternative.

So I set out to paint stripes as a headboard for the guest bed to coordinate with the bedding. I considered doing it only in one area directly behind the bed, but I knew that we might want to shift the bed along the wall one day and not be married to that one particular location. So I committed to striping the whole wall.

I drew level vertical lines on the wall and then taped them off. I know people swear by frog tape to assure there is no bleeding, but this method worked for me: I used standard blue painter's tape, then I scraped over the tape with a spatula to ensure it was really on there. I had no problem with bleeding.

Once the tape was up, I took the paint chips of my colors and cut them into small strips. I used the strips to mark which stripes would be which color to make sure it looked random enough. When I was satisfied I started painting.

This is the point at which Jeff came home from work and was a little surprised to see what I had been up to all day.

I love how it turned out. It's unique and playful and catches visitor's eyes.